Showing posts with label pattern. Show all posts

Doilies!


I always used to think doilies were so old fashioned and not for young women like myself to be making, but recently I realized just how awesome and fun these pretty things are to crochet! You work in the round, so you can pretty much make it up as you go along, using simple repeating patterns or intricate designs, as long as you increase enough to keep it growing! To get you started, here's a simple pattern that I came up with for practice!

Simple Doily Pattern
Skills needed: magic ring, chain, slip stitch, double crochet, half double crochet, increase
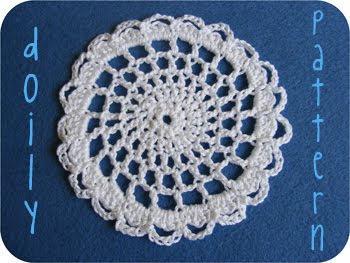
This can be made with any yarn and hook. Acrylic doilies will be about 7 inches in diameter, while cotton crochet thread doilies will be about 4 inches in diameter, when made with the recommended hook size.

1. Start with a magic ring (or you could just chain 4 and slip stitch into the first chain to form a ring).

2. Double crochet 10 into the ring.

3. Chain 2. Double crochet twice into each stitch of the previous round until you get to the last stitch. Double crochet once in this stitch and slip stitch into the chain space to complete the round.

4. Chain 3. Skip the first stitch and double crochet once in the next one. Chain one. Skip the next stitch and double crochet once in the next one. Repeat until you come to the second to last stitch. Chain one and slip stitch into the chain space (where you started) to complete the round.

5. Chain 4. Skip the space made by the chain in the previous round and double crochet once into the next stitch, then chain two. Repeat this until you come to the last stitch of the round. (You should never make a stitch into an open space, only into stitches of the previous round.) Chain 2 and slip stitch into the chain space you began with to complete the round.

6. Chain 6. Repeat the last round, but chain 4 between each stitch this time.

7. After you slip stitch to complete the round, chain one. In the space made by the four chains of the previous round, half-double crochet once, double crochet twice, and half-double once more. Then slip stitch into the stitch of the previous round. Repeat that pattern for the entire round. After the last repeat, slip stitch into the chain you began with.

8. Chain 6, then slip stitch into the slip stitch you made between repeats in the previous round. Repeat this all the way around. When you reach the end, just bind off, weave in your ends, and you're done!

I hope that was easy enough to understand! Have fun making your doilies, and post them in the Birds Flickr group so we can all enjoy them! :D

DIY Sunday: cute apple coaster

Hey everyone!

Welcome to DIY Sunday # 4! :) My favorite colour?! Well, I would say AQUA. But that changes a lot and I could not say I have one all time favorite colour!

*sigh* pretty, eh?!

But let's move on to todays DIY! I really LOVE making these because they are so so fast! See:


To make these cute coasters, all you need is:


red, green and brown felt, a pair of scissors, the pattern and thread (+ sewing needle ^^)!

First, cut two pieces of each part of the apple from felt!


Then, take some pins to keep the parts together.


Now, guess what?! Take some thread and a sewing needle and sew the parts together. Use a simple stitch, doesn't have to be over-the-top complicated, you know?! :D


And that's it!


This is a perfect and quick Sunday afternoon project! Hope you liked my cute little tutorial this Sunday and see you again in a week ;)


xo.
Katja


PS: Make sure to join the GIVEAWAY over at my blog!

To Boldly Crochet What No One Has Crocheted Before...

Hello everyone! Here's my answer to this week's little question: I like my Easter eggs full of caramel or peanut butter! I don't like eggs much (unless they're deviled!), but these:


are my favorite parts of the holiday!

Anyway, here's what I promised you last Wednesday:


Today I'm going to share my pattern for this cute little Starfleet Insignia, from the Star Trek series! I made up the first one as I went along, and then wrote the pattern as I made a second one, so it may not be prefect! Make adjustments as you see fit, and email me if you figure out a better way to do something! And make sure you post pictures of whatever you use this on in our Flickr! I'm not sure what to do with mine yet, but I suggest making a brooch out of it and pinning it on a bag, perhaps?

I made the first one, the gold, with a 4mm hook and some regular Red Heart acrylic. The second one, the grey, was done with the same kind of yarn and a 5mm hook. They are both a little over 3 inches long.

1. Chain 2.

2. Single crochet 2 into the second chain from the hook. Chain 1 and turn.

3. Single crochet 2. Chain 1 and turn.

4. Increase 1. Single crochet 1. (You should have 3 stitches in this row.) Chain one and turn.

5. Increase 1. Single crochet 2. (You should have 4 stitches in this row.) Chain 1 and turn.

6. Single crochet 4. Chain 1 and turn.

7. Increase 1. Single crochet 2. Increase 1. (You should have 6 stitches in this row.) Chain 1 and turn.

8. Single crochet 6. Chain 1 and turn.

9. Increase 1. Single crochet 4. Increase 1. (You should have 8 stitches in this row.) Chain 1 and turn.

10. Single crochet 8. Chain 1 and turn.

11. Single crochet 8. Chain 1 and turn.

12. Single crochet 3. Chain 1 and turn.

13. Decrease once. Single crochet 1. Chain 1 and turn.

14. Single crochet 2. Chain 1 and turn.

15. Decrease once. Bind off and cut yarn.

16. Put a slip knot on your hook. Insert the hook into the next stitch:


Put the yarn over the hook and pull it through the stitch. Yarn over again and pull through both loops on the hook. Single crochet 4. Chain 1 and turn.

17. Single crochet 3. Decrease once. Chain 1 and turn.

18. Single crochet 4. Chain 1 and turn.

19. Single crochet 2. Decrease once. Chain 1 and turn.

20. Single crochet 3. Chain 1 and turn.

21. Single crochet 1. Decrease once. Chain 1 and turn.

22. Decrease once. Bind off and cut yarn.


Finishing: Make sure the insignia is facing the correct way and weave in all ends. Add felt embellishments if desired (reference images here). Add a pin to the back and put it on a bag, or make it into a hair clip or a headband!

I hope everyone understands the pattern alright. This is the first time I've ever made one, so I decided against using all the abbreviations and such. I figured it would be easier if I wrote everything out.

By the way, if you aren't into Star Trek, you can also use the same technique to make little hearts! That idea came from this awesome blog post on Bella Dia.

Until next week, live long and prosper!