Showing posts with label tutorial. Show all posts
Happy Sunday , lovelies!
Today, I have a tutorial waiting for you…

owl00

You will need:

owl1

Felt

fabric scraps

thread and needle

scissors

keychain

First, download, print and cut out the owl pattern ;D

owl2

Then, cut out two pieces of the body.

owl3

Then, use fabric to cut out the wings.

owl4

Now, you can cut out a half circle of a different colour of felt.

owl5

See? :)

owl6

Sew it to the body.

owl7

owl8

Then, add the wings.

owl9

And two buttons for the eyes.

owl10

Already looks cute, right?

owl11

Now, cut a triangle to make the beak.

owl12

Now, cut a strap from the felt to use it as the hanger…. Also take the second body piece….

owl13

and start sewing both pieces together.

owl14

Don’t forget to add the hanger!!!!

owl15

If you have been sewing halfway round the body, stuff the owl.

owl16

Keep sewing around it and now… you are done! :) HAHA!

HOOT HOOT!

Loves,

Katja

Five Bun Hairstyle Tutorial

While browsing for Vintage hairstyles a couple of weeks ago, I got inspired to try some new techniques out on my hair. I came up with super easy 5 BUN style that was super easy and fun.

This hairstyle is great because it is perfect for a vintage dress, casual outfit or you could even wear it out for an elegant up-do. My favorite part about it, if the weather gets really humid or rainy and you've got a tiny bit of curl to your hair from the moisture in the air, you can save a limp, raggy-looking style with this quick fix-up.


My hair is a little too straight for this style...I recommend having your hair slightly curled so that the buns will wrap around easier. I like to use this hairstyle when my hair is really wavy or curly from rain/going to bed with damp hair/or just otherwise in need of taming!

You will need:
Curling iron, or slightly curled hair
bobby pins-lots!
rubberband/ponytail holder
hairspray
hand mirror and regular mirror
maybe a comb or brush
 hi!


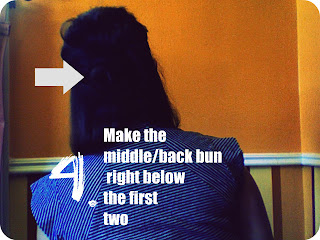
TIP: You might want to use two mirrors to get these last two bun in the right spot so they aren't to low or to far to the side. Getting those two buns in the right spot is the difference in making the whole thing slightly wonky or perfect!

 I went outside to try to get a better picture of how the buns look in back...my hair is a super dark and it was late evening so I didn't get the best image...but you get the idea!

Hope you try this! Put your a link in the comments if you decide to try this style, I would love to see it!

DIY Sunday - felt bow tutorial

Hi everyone!

Todays' DIY is one of my favorite quick crafts ever: A felt bow hairclip.


You will need:

felt, a hairclip, thread and needle, a scissors

:)


First, cut a strap from your felt.


Now, fold the felt in 3 steps.


Then, cut a smaller strap from the felt.


And now, take thread and needle, and add some loose stitches to the bigger part of the felt.


Pull the thread to create the typical bow shape!


And now, add the smaller strap of felt.


Now you already have a bow xD


Sew your hairclip to the back.


And now your hairclip is done!!!!! Hooray for quick crafts, right? Happy Sunday, loves.

xo.

Katja

Sunday DIY - apron

Hello friends!!! :D

Sorry for not posting a DIY last Sunday... But as an excuse, todays DIY is fabulous! Promised...
You all might know how much I love retro things. And the best retro thingie is: an apron! So here's mine:


Cute?! Hell yeah! :D

And so so so SO simple. You only need:


Fabric, a pair of scissors and your sewing machine.


To find out the perfect size, wrap the fabric around your belly... I took the size of one bone to the other as the perfect size for it.


Cut a piece of your measured size.


Fold to half.


Cut round edges.


Now you have a apron shaped piece of fabric.


And cut some stripes from your fabric. They will become your ruffles later.


Now, fold the fabric edges.


And now, add the ruffles. Therefore, simply fold the fabric spaced and use pins to fix it.


That's what it will look like before sewing. :)


Now, you will need 2 fabric straps. They will be your apron belt. Cut them so they can be wrapped around your body and make sure you will be able to tie a knot.


Fold them to half, the inner side up.


Sew them together.


Finish it beveled. Leave the other side open.


Turn it inside out.


And now, add it to the top of your apron.


Fold the fabric over the belt piece.


And now sew along the apron lines.


Use a simple stitch to sew along the lines and a zig zag stitch to sew along the top side and then, along the lower top side where the belt pieces are.


See?! :D


And now, you have a very cute apron to style you pretty when you work at home or clean the house or bake or cook or just for fun! :D

I hope this tutorial was easy to understand and to follow and even though my english these days isn't the best, - I hope you will be able to make your own apron soon!

Thanks everyone for your support and love.

XO!
Katja