Showing posts with label scrapbooking. Show all posts

Sunday DIY - the envelope mini abum

Hi everyone!

Everyone knows autumn is just around the corner and I thought it would be the perfect time for a mini album to keep summer memories.


You will need

envelopes in different styles and sizes, a hole puncher, a ring to keep the "pages" together, photos, scissors, glue, stickers and decoration


First, take the envelopes and lay one on another.


Punch a hole in every enevelope.


Pull the ring through the holes. Basically, your mini album is finished. :)


Now, start decorating your pages. I'll show you mine for some inspiration.


You can also use the envelopes to store some secret letters or special paper things inside.


I hope you liked this DIY project as much as I do and can't wait to see some of your mini albums!


Have a crafty Sunday!!!!

xo.

Katja

DIY -flowers part 3-

Well hello, we meet again :)
Today we're gonna make some flowers, ready?!

I've used: plain chipboard, felt, plastic, paper, woodgrain (adhesive foil),
acrylic paint, a paint brush, buttons, hotglue gun, and embroidery thread.

don't you just like a plate of those :)

These are all the flowers that i made!

1. your own flower paper, that you can use for scrapbooking!
I used a white printing paper and painted flowers and dots with acrylic paint on it. I find it easier to paint a bigger paper at once than a few little ones. Once you're done just fold your paper and cut it in as many pieces as you want! I made a very easy background this time, but you can make it with bigger dots, hearts etc.... have fun :)

2. a plastic flower with button
Find some firm plastic, draw a flower, cut it out and paint the edges with acrylic. If you like you can sew or glue a button in the middle.

3. a flower from felt with button
Choose a color of felt that you would like to use, draw a flower, cut it out and sew a pretty button in the middle.

4. a woodgrain flower with button
I've used one white printing paper and some self adhesive woodgrain foil. The woodgrain foil is sticky, so it's easy to paste it on the white paper. Then i drawed flowers on the woodgrain, cut them out of the paper and added buttons in the middle with my hotglue gun.

5. a chipboard painted flower with button
Find some chipboard (you can even use a empty rice box if you like) and draw a flower on it & cut it out. I've used a lighter purple for the flower and also a darker one for the edges ;) Add a button and you're ready.

You can make a cute scrapbookpage with
your handmade flowers :)

These are my woodgrain flowers :)
I used several to make a cute little photoframe and
i also used one as a hairdecoration!


I hope you have enjoyed this post :)
If you have any questions just leave a comment!
Wishing you a lovely day :)
XOXO.
Vera

Las Vegas Memory Album

Hello!! I am so excited to show you the first few pages of my Las Vegas  Trip Memory Album. You can read about my preliminary work, getting the pictures ready, here and here.


For this album, I decided not to use the 12X12 album and opted instead for a very versatile 8 1/2 X 11 three-ring notebook. I picked up a couple of pretty ones at Target recently and I knew that I had to use one for this book. When selecting an album, choose something you really like!

The smaller format allows me a fair amount of flexibility and I love being able to move the pages around easily using clear photo-safe page protectors. Normally, when I go on a long trip, I try to keep a travel journal so that I can jot down my thoughts and ideas while I am actually in the moment. Since I was sick right up until the day of the trip, a travel journal was at the bottom of my list of priorities. I am still able to recall quite a bit just by looking through the pictures.
On this page, I used a clear screenprinted page from Hambly. Since I wanted to use both sides, I just used two collages of the same size and put my titles in the same place on each side....This also covers any adhesive that might have otherwise shown through.

It is hard to photograph those clear pages without a glare! I absolutely love Hambly papers!!

I have a ton of trip ephemera and I wanted to keep this page from a magazine. I have always loved using things that are already printed, so I simply covered the original magazine image with a picture of me! Haha!!

This was a fun page to make it was so simple. Just some handwritten journaling, thickers lettters, and a pre-made photo collage. Oh, and I used up some stickers that I have been holding on to for ages!

I decided to create pages on the back of each page....her is what is on the back of the page above.
I had a mishmash of iphone photos from the plane ride...they aren't that great in quality, but paired up with the journaling, they tell a great story about flying, for me.


We ate a lot on our trip so I wanted to dedicate a page to our food experiences. I could have written a whole lot more about each experience (I probably will write more later) but this is a general page dedicated to the food. I used a receipt and snipits from a magazine about the various restaurants.


Okay, this is probably my favorite page of all! I knew I was going to make this page the second they slid my headbands down into the paper bag. I almost said, 'No thanks, I don't need a bag,' but then I saw how cool it was! I trimmed it down to 8 1/2 X 11 and rounded the corners. A photo from my shopping experience is paired with some magazine clippings and a scrap from the Urban Outfitters catalog. I also did some real stitching on this page with my sewing machine!


Peeps, Photography, Principles, and Picnik

Happy 'Almost' Easter everyone!! My favorite way to eat an Easter egg? Well, I don't really indulge in the hard boiled eggs very often, but I do LOVE Cadbury candy coated chocolate eggs. They are probably my favorite candy in the world! Easter is the BEST holiday for candy. I am not really into peeps, but there is a lot of yummy candy on the shelves right now. What is your favorite??


For my birthday weekend in April, I am planning a big scrapbooking/crafting retreat April 16th, 17th, and 18th. I am planning on putting together some sort of a mini-book from my recent Las Vegas trip. For the next few weeks I will be sharing my progress with you on this big project.

Read more about my goals here.

Continued...

My goal for this week included editing my photos and getting them printed so that I can start putting them into a book form.

I love adding text to my photos. I even like to add the occasional 'sticker.' I am not a genius at photoshop or anything like that, so I do nearly all of my editing on Picnik. You can try the software for free if you are interested, you can upgrade to a premium account for one year. It is sooo worth it for me!

If and when you decide to add things like text or 'stickers' or fancy frames to your photos, there are a few do's and don'ts that just seem appropriate to me as someone who is familiar with the principles of art, I tend to implement them without realizing why or what I am doing.

Now, take them for what they are worth. You may completely disagree with me, but I just cringe on facebook when people picnik a photo and it is just ruined by the 'creative' editing that the person did. Granted, there is a learning curve...I am sure I ruined some of my first images by getting to liberal with my edits...But the more I work with the program, the more I learn about what looks good and appropriate.

1. Do create collages with photos that don't deserve a scrapbook page all alone. Similar themes that seem to go together will create lovely collages. With this 'architecture' collage below, I loved how all the photos had a 'worm's eye view' so I wanted to put them all together to add a bit of visual drama! By playing around with PROPORTION, your photos can become a work of art! You will see that nearly all of my collages below have some sort of a theme. By grouping them, I am able to tell a non-linear story from my trip.

By stacking the photos from shortest to tallest, I have created MOVEMENT across the composition.

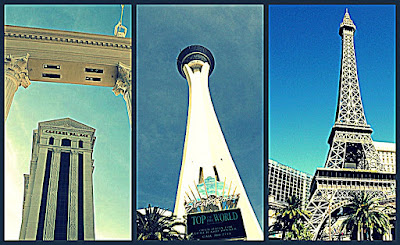
(This collage was edited using the 'cross process' filter. I really liked the way that it UNIFIED the blues in the sky.)

2. Do 
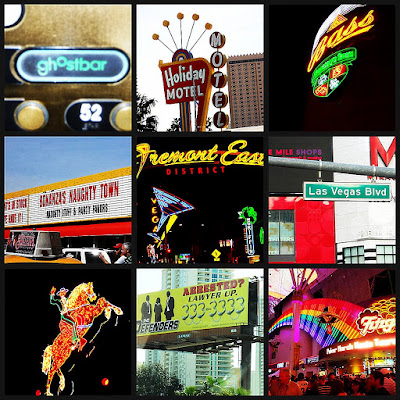
create with photos that you might've normally thrown away or deleted. I love creating these collages because I probably wouldn't have printed all of the the photos below...but when I put them together, they look really neat. By using REPETITION, in the same-sized squares, the composition works even when the photos have completely contrasting elements.
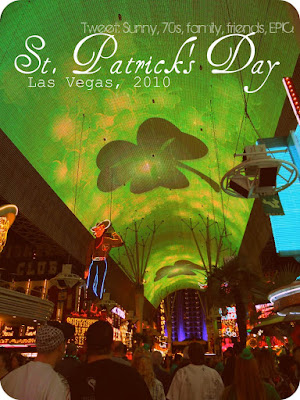
3. Do group pictures of certain people or places. Sometimes it is easier to have all the photos in one place rather than have to think of how to journal for each one individually. I ran these collages through a series of photos through a couple of filters. I am not totally happy with the resolution on the first one...but I felt like the pictures needed something to create HARMONY between the photos...by changing the texture, as opposed to converting them to black and white, I am hoping they will look a little more unified without losing the great color! I love to modify the texture by using one of the picnik filters (or if you are Photoshop savvy, you probably know how to do this!). You have to be careful though, sometimes a little bit goes a long way and you can lose the essence, simplicity and beauty of your photos.


4. Don't do anything that you see below in the next photo. I edited it two ways to show you what makes me cringe about some of my Facebook picnikers. Things that are wrong with the first photo:
  • The text is bad. Font is bad, placement and color are both bad. Don't be afraid to rotate your text to make it work for the layout of your photo. (See good version below!)
  • The frame is horrible. Just because the frame is cute or it matches the season...that doesn't mean it is going to make my photo timeless...it might do the opposite...it might make my picture look dated.
  • The sticker crown is just dorky and doesn't have anything to do with what was going on that day. Refrain from adding little 'stickers' just because they are cute. If I had a picture of a bulldog and his name was kingsley, the crown would be appropriate! Obviously this is an exaggerated example...I am ALL for adding hearts, mustaches and even little flowers to my photos....just be careful that what you are adding actually ADDs to the design and doesn't distract from what is important.
5. Do change photos to black and white with a pop of color for CONTRAST. Below is the exact same photo and here are the things that work:
  • In this photo, my dress didn't match the coloring of the heart so I converted the photo to black and white, leaving the heart in color.
  • I made sure that the font was playful and matched the mood of the photo. By keeping the font black, it mirrors the hand-drawn look of the heart! I also rotated the text to hug the edge of the photo rather than overlap the important parts of the photo: me and the heart. This creates a visual BALANCE.
  • After converting the photo to black and white, I also used a 'cross processing' filter so that the white would have a yellowish tinge and I rounded the corners. I try not to get too corner-rounder happy. I love the look of rounded corners, but it isn't always appropriate.

6. Don't be afraid to use status updates, memorable quotes or tweets from that day as your journaling or title! Also, DO layer various fonts. I use graphic posters, magazine covers and even websites for inspiration. Sometimes I like to fade some of the 'subtitles' a little to really emphasize the main headline.


Well, those are the main tips that I have for you. I ordered my photos on Saturday from Snapfish and I can't wait to get them back (yay free shipping coupon)!! Here are a few more collages. I will share my journaling with you so that I can get a head start and have a little bit done whenever my prints arrive!

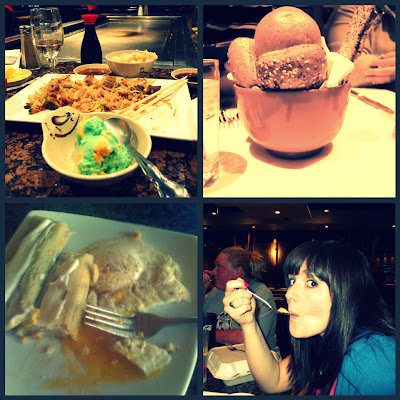
Food, food, food. Las Vegas is all about eating. The first photo in the collage shows our dinner at the Japanese steakhouse in Tulsa before we even left for Vegas! I didn't take a photo of every meal, but I certainly could have. The bread on the right is from our fancy steak dinner-yum! The bottom left picture is a meal prepared by my sister-in-law's mom, Frances. She was a fantastic cook. I am still craving those tamales and eggs!!

Airplane, airplane. I love to travel. I especially love airports and flying. I wish that I could travel in my career. I am already anxious to go on another flying adventure. I always try to have a carry on that is a backpack. I have found that shoulder bags can be very annoying an heavy when standing in line or walking through terminals. In my carry on, I always try to have something to read. I love to take magazines and then leave them behind for people in the airport to enjoy. The book that I chose for this trip is by Tom Robbins...wow, so visually stunning, I can't wait to finish it! I love to sit by the window. The flight from Vegas to Denver was absolutely beautiful, those are snow-covered Rocky mountains, not clouds! I love airline snacks and meals. I have been on flights that serve up to 3 courses and I always wake up long enough to lower my tray table so that I don't miss the snack and complimentary beverage. Isn't it funny how people order ginger ale and tomato juice on airline flights....I would never order either one anywhere else!

(photos taken on my iPhone)

Okay, I hope I didn't use to many art teacher terms for you...as I read back over my post, I noticed that I used a lot of principles of art, UNITY, EMPHASIS, CONTRAST, REPETITION, BALANCE, HARMONY, PROPORTION. These concepts come naturally to me...I don't have to force it...I really wanted to share with you what goes on in my head when I am editing my photos to create one-of-a-kind works of art for my albums and scrapbooks.

I hope you will check back on my progress next week. (and I hope my photos are here!) If my photos do not arrive in time for me to get anything done before my post, I have something special planned!

To be continued......

Bird. Bird. Bird. Bird is the Word

Hello, I am Nellie, I am the turquoise owl holding the little Polaroid camera. You can usually find me over at This Little Blog of Mine.

Our blog header is just lovely isn't it? (Thanks Katja!!)

I am so excited to be a contributor for this gorgeous blog. We have some seriously talented ladies on board to post something lovely for you every day of the week--how awesome is that?

And, it all started with one tweet. That's right. One tweet and here we go!!

Do you have like a zillion pictures sitting in boxes from trips or special occasions? Over the next few weeks {each Monday} I will share with you my techniques for capturing the essence of a special vacation, or other event, so that you can get those photos out of the boxes (or off the hard drive) and into some sort of form that will allow you to share them with others. You might be getting ready to start a big project of your own in the form of spring cleaning....so I hope this will inspire you!

Call it scrapbooking, call it whatever you want....saving photos and ephemera and capturing the story of a trip or special time in your life is just plain cool--and it can be really beautiful. If you have ever been overwhelmed by the idea of all the 'stuff' that goes along with scrapbooking, don't be freaked out by this post. You might {as I am hoping} get inspired to join me on the important task of telling your stories. Starting with one trip, I am going to do my best to create something really special using my pictures!! I love this process, I hope you will enjoy it too!


Last week, I traveled with friends to the fabulous city of Las Vegas--and I took all of my crafting budget with me. This is the first time in a REALLY, REALLY long time that I did not buy ANY scrapbooking or crafting supplies in a month. NONE!


And as a result I am feeling a little uninspired but at the same time, I want to get all of my photos printed so I can just play, play, play. I love to create mini-books and albums with trip ephemera and photos.

I took some time yesterday to edit my photos (Ohgosh-I have almost 500 pictures) and I am still in the process of uploading them to snapfish. The editing process for me is just a matter of some basic cropping, adjusting the white balance, adjusting the contrast, flipping to vertical or converting to black and white. I try to modify the image so that it will look good whenever it is printed.

I created some folders on my desktop labeled "Favorite Baby Jacob Pictures" and "Favorites from Las Vegas Day 1". (No, I did not take a baby to Vegas--I stayed a few extra days in Lake Havasu, AZ to visit my sweet baby nephew--my favorite part of the trip!)

(Yes, there is a story with this picture. I can't wait to tell it!)

By creating folders on my desk top, I can more easily wade through and pare down all those random pictures of cool signs, graffiti, trash, sunsets, random strangers or whatever else may have squeaked its way from the memory stick of my camera onto my hard drive.


Sometimes I save those random shots in iPhoto...but I don't upload them ALL to be printed...but I also don't want to delete them...I am a photo hoarder. How many photos do I have in iPhoto? Well....I got this computer in May 2009....and I have 9,869. Today. There will be more tomorrow from a variety of digital cameras, my iPhone and possibly even photos that I scan in...like the Instax pictures from the trip! (That doesn't even include all the photos I have in other folders that I use for inspiration, school projects and other stuff!)

(This one has a sweet story too! Suggestions for captions, anyone??)

So in order to keep from having twenty zillion photos printed and gathering dust, I will have a some printed as collages. I will also add some text in the form of journaling and titles to some of the individual photos. I will use my favorites on scrapbook pages or in a mini-book. I will give some away and I might even frame a few. By organizing my favorites on my desktop into photos, I have exported a smaller copy of the photos out of iPhoto which is easier to upload to Facebook, Picnik, and my blog.
(Hi from the GhostBar on top of the Palms!)

I work full time so I can't devote more than an hour or so a day to this project....maybe less than that some days....or more on the weekends. I also like to make cards, watch t.v. (like Lost, Grey's Anatomy, American Idol, and a whole host of other reality t.v.) so I don't want this project to consume my life...but it is important to me.

(Hi from the top of the Stratosphere!)

My goal this week is to create the digital photo collages and add text to some of the photos. I am not a PhotoShop guru....I primarily use Picnik for adding text and other things. I hope to have a large batch printed by next week. And then the fun begins. I will share some of the collages with you next week, and then I will hopefully make some progress as I share a mini-album or a scrapbook layout or two in April once the photos are printed.

I hope you will check back each Monday for this series. I need the moral support to keep this daunting task alive, otherwise I will be just like you with all my photos in a box (or on my hard drive!) Also, I promise my next post won't have so many pictures of me---creeper alert--ha!

Have a great week--I hope it looks like spring wherever you are!

To be continued....