Showing posts with label Emily. Show all posts

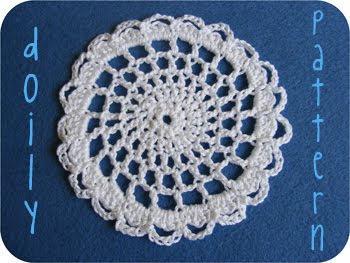
Doilies!


I always used to think doilies were so old fashioned and not for young women like myself to be making, but recently I realized just how awesome and fun these pretty things are to crochet! You work in the round, so you can pretty much make it up as you go along, using simple repeating patterns or intricate designs, as long as you increase enough to keep it growing! To get you started, here's a simple pattern that I came up with for practice!

Simple Doily Pattern
Skills needed: magic ring, chain, slip stitch, double crochet, half double crochet, increase
This can be made with any yarn and hook. Acrylic doilies will be about 7 inches in diameter, while cotton crochet thread doilies will be about 4 inches in diameter, when made with the recommended hook size.

1. Start with a magic ring (or you could just chain 4 and slip stitch into the first chain to form a ring).

2. Double crochet 10 into the ring.

3. Chain 2. Double crochet twice into each stitch of the previous round until you get to the last stitch. Double crochet once in this stitch and slip stitch into the chain space to complete the round.

4. Chain 3. Skip the first stitch and double crochet once in the next one. Chain one. Skip the next stitch and double crochet once in the next one. Repeat until you come to the second to last stitch. Chain one and slip stitch into the chain space (where you started) to complete the round.

5. Chain 4. Skip the space made by the chain in the previous round and double crochet once into the next stitch, then chain two. Repeat this until you come to the last stitch of the round. (You should never make a stitch into an open space, only into stitches of the previous round.) Chain 2 and slip stitch into the chain space you began with to complete the round.

6. Chain 6. Repeat the last round, but chain 4 between each stitch this time.

7. After you slip stitch to complete the round, chain one. In the space made by the four chains of the previous round, half-double crochet once, double crochet twice, and half-double once more. Then slip stitch into the stitch of the previous round. Repeat that pattern for the entire round. After the last repeat, slip stitch into the chain you began with.

8. Chain 6, then slip stitch into the slip stitch you made between repeats in the previous round. Repeat this all the way around. When you reach the end, just bind off, weave in your ends, and you're done!

I hope that was easy enough to understand! Have fun making your doilies, and post them in the Birds Flickr group so we can all enjoy them! :D

Amigurumi Body Base

Hello everyone! Today I'm going to share a simple crochet pattern that I wrote for a basic amigurumi body.


[Please note: I wrote this pattern from memory, so it's largely untested. If you come across any mistakes, please let me know and I will fix them!]

Amigurumi Body Base
Skills needed: magic ring, crochet in the round, single crochet, increase and decrease
Yarn: Red Heart acrylic
Hook size: F/3.75 mm

Begin with the body color. I used black for this example, but use either a flesh tone (if adding fabric clothes) or the color you want the person's pants to be.)
1. Start with six single crochet stitches in a magic ring.
2. Single crochet twice in each stitch around, increasing to 12.
3. *Single crochet once, then single crochet twice in the next stitch.* Repeat ** six times, increasing to 18.
4. Single crochet once in the back loop of each stitch around.
5. Single crochet once in each stitch around.
6. *Single crochet twice, then single crochet twice in the next stitch.* Repeat ** six times, increasing to 24.
7-13. Single crochet in each stitch around.
(If you began with the color of the pants, change to the color of the shirt after row 9.)
14. *Single crochet twice, then crochet two together.* Repeat ** six times, decreasing to 18.
15. *Single crochet once, then crochet two together.* Repeat ** six times, decreasing to 12.
(Stuff the body before changing to a flesh tone for the head.)
16. *Single crochet once, then single crochet twice in the next stitch.* Repeat ** six times, increasing to 18.
17. *Single crochet twice, then single crochet twice in the next stitch.* Repeat ** six times, increasing to 24.
18. Single crochet in each stitch around.
19. *Single crochet twice, then crochet two together.* Repeat ** six times, decreasing to 18.
(If using snap on eyes, insert them at this time between the two rows of 24.)
20. *Single crochet once, then crochet two together.* Repeat ** six times, decreasing to 12.
(Stuff the head carefully.)
21. *Crochet two together.* Repeat ** six times, decreasing to six, and bind off.
You can sew the remaining hole together or do as I did and slip stitch in each stitch around before binding off, then tuck the tail inside. The tiny hole should be unnoticeable and will probably be covered with hair, anyway.

So there you go! Quick and easy. It'll end up being about 4 inches tall, if your stitches are as tight as mine end up being.

Oh, and here's an easy tutorial for adding hair to amigurumi heads, in case you wondered how!

See you next week(:

One of my other loves...

That would be reading! I go through books like a little kid goes through candy! I love to read, and I love to craft, and I bet some of you do, too, so I thought this week I'd share a list of the crafty books I've read lately! I hope these can offer all of you the same inspiration they give me!
(Btw, all the links go to Amazon pages, unless otherwise stated.)

Chicks With Sticks was the very first book I read that was about knitting, I think. It's about a group of very different high school girls who are brought together by their love of knitting and a cute yarn shop. It's probably more for the younger crowd, but hey: I'm 17, and while I love adult novels, young adult stuff is always fun, too.

Stephanie Pearl-McPhee Casts Off is a cute, funny, beginners guide to knitting. It's great to read for instruction or just to have a few laughs. It's not a novel, but it's structured sort of like a travel guide to a foreign country, and it has a few little characters and plots woven throughout. Stephanie also has a blog here.

The Friday Night Knitting Club could be called the grown-up version of Chicks With Sticks. The idea is similar: a group of unlikely friends comes together through the power of a cozy yarn shop and some skeins and sticks. I loved this book. It's humorous and heart-wrenching at all the right moments. You'll really get attached to the characters. It has a sequel, Knit Two, and Kate Jacobs has also written an awesome novel for those who prefer cooking to crafting, Comfort Food.


My mom picked this one up because the title seemed a little absurd, but it turned out to be a great book! The Cat, the Quilt, and the Corpse is a murder mystery that involves a cat burglar (literally!) and lots of quilts. It's a typical serial mystery book, making it a quick but satisfying read.

The Handmade Marketplace is something I picked up when I was considering starting up my own Etsy shop. It's really helpful and informational, plus it's full of cute illustrations by Emily Martin of The Black Apple. It's all about getting your crafts out there and making a profit from what you love.

The Guerilla Art Kit is my favorite of Keri Smith's wonderful books (though maybe it's tied with How to Be an Explorer of the World). It's pretty much a book of tutorials on how to do cool stuff like make your own stickers and seed bombs, as well as fun activities to do to brighten random people's days. I get inspired every time I look through it again.

Waking Up in the Land of Glitter is what I just finished reading today! It's sitting right next to my foot as I write this post. This one is about the art scene in Phoenix, Arizona (which sounds like a great place to live, btw!) and a bunch of "crafty chicas" who live there. There's a lot of commentary on inspiration and "art" versus "craft" that's pretty interesting. There isn't a sequel, which is sad, because it definitely left me wanting more! But the author has a blog here.

Well, that's all for now! And if any of you have suggestions that aren't on my list, go ahead and post them in the comments! I could always use another good book to read. :D

Quick Spring Freebie! :D


Hi everyone!

Well, my favorite thing about spring is the cute, fun pastel colors! And I also love flowers, and cupcakes, so I thought I'd offer up these cute cupcakes toppers that I drew up for you all to download! (Yes, these are the same ones I posted awhile back on Katie's blog, Punk Projects, but I figured it wouldn't hurt to give them to you all, too!)


So here they are! Download the PDF here at Mediafire, and then you can follow my tutorial to turn the little images into cupcake toppers!

I hope you have fun with these! Make sure you post pictures of your cupcakes in our Flickr if you use them! :D

To Boldly Crochet What No One Has Crocheted Before...

Hello everyone! Here's my answer to this week's little question: I like my Easter eggs full of caramel or peanut butter! I don't like eggs much (unless they're deviled!), but these:


are my favorite parts of the holiday!

Anyway, here's what I promised you last Wednesday:


Today I'm going to share my pattern for this cute little Starfleet Insignia, from the Star Trek series! I made up the first one as I went along, and then wrote the pattern as I made a second one, so it may not be prefect! Make adjustments as you see fit, and email me if you figure out a better way to do something! And make sure you post pictures of whatever you use this on in our Flickr! I'm not sure what to do with mine yet, but I suggest making a brooch out of it and pinning it on a bag, perhaps?

I made the first one, the gold, with a 4mm hook and some regular Red Heart acrylic. The second one, the grey, was done with the same kind of yarn and a 5mm hook. They are both a little over 3 inches long.

1. Chain 2.

2. Single crochet 2 into the second chain from the hook. Chain 1 and turn.

3. Single crochet 2. Chain 1 and turn.

4. Increase 1. Single crochet 1. (You should have 3 stitches in this row.) Chain one and turn.

5. Increase 1. Single crochet 2. (You should have 4 stitches in this row.) Chain 1 and turn.

6. Single crochet 4. Chain 1 and turn.

7. Increase 1. Single crochet 2. Increase 1. (You should have 6 stitches in this row.) Chain 1 and turn.

8. Single crochet 6. Chain 1 and turn.

9. Increase 1. Single crochet 4. Increase 1. (You should have 8 stitches in this row.) Chain 1 and turn.

10. Single crochet 8. Chain 1 and turn.

11. Single crochet 8. Chain 1 and turn.

12. Single crochet 3. Chain 1 and turn.

13. Decrease once. Single crochet 1. Chain 1 and turn.

14. Single crochet 2. Chain 1 and turn.

15. Decrease once. Bind off and cut yarn.

16. Put a slip knot on your hook. Insert the hook into the next stitch:


Put the yarn over the hook and pull it through the stitch. Yarn over again and pull through both loops on the hook. Single crochet 4. Chain 1 and turn.

17. Single crochet 3. Decrease once. Chain 1 and turn.

18. Single crochet 4. Chain 1 and turn.

19. Single crochet 2. Decrease once. Chain 1 and turn.

20. Single crochet 3. Chain 1 and turn.

21. Single crochet 1. Decrease once. Chain 1 and turn.

22. Decrease once. Bind off and cut yarn.


Finishing: Make sure the insignia is facing the correct way and weave in all ends. Add felt embellishments if desired (reference images here). Add a pin to the back and put it on a bag, or make it into a hair clip or a headband!

I hope everyone understands the pattern alright. This is the first time I've ever made one, so I decided against using all the abbreviations and such. I figured it would be easier if I wrote everything out.

By the way, if you aren't into Star Trek, you can also use the same technique to make little hearts! That idea came from this awesome blog post on Bella Dia.

Until next week, live long and prosper!

Happy Hooking!

Hi, darlings! I'm Emily Mae. My owl is the little pink one with the crochet hook in one hand (wing?) and the iPhone in the other!

Each week, I'll be bringing you some inspiration in the form of fun projects, patterns or pictures involving crochet (my favorite craft) or generally "geeky" things (because I'm such a nerd at heart, really).

Today I thought I'd just give you all a little introduction in the form of something I call a "lovelies" post, like I do (almost) every Monday on my own blog, Divine Chaos! I'll probably do one of these every few weeks in the future(:

1. Lovely purse

2. Lovely (faux) taxidermy!
I'd love some of these guys on my walls.

3. Lovely little guys!
I'm such a scifi nerd.

4. Lovely stones (and other things).

5. Lovely display.
I wish I had shelves full of yarn-y goodness like this!

6. Lovely (and completely awesome) rug!

7. Lovely sundae!
Yum(:

8. Lovely granny squares.
Well, granny hexagons. I want one of these blankets!

9. Lovely "cupcakes"!
Red velvet, hehe!

10. Lovely whimsical creature!

And here's a bonus: a little something to look forward to next week!

I'll be sharing the pattern and technique to make your very own Starfleet insignia! (I'll also be posting a variation on it that makes a cute heart, for those of you not as obsessed with Trek as I am!)

xoxo
Emily Mae