Showing posts with label flower. Show all posts

a quick hello

Today went by fast. Far to fast. It is bedtime already and I haven't even blogged.
So today just a quick hello from me and the Lupins from my garden.

DIY Sunday - fake flowers

Hi there!
Today is the sunniest day since last summer aaaaand I was sitting on my new decorated balcony to create some magic! So here's your new DIY:


A cute fake flower for your garden or to decorate your room.


Here's what you will need:
- yarn (I chose purple and dark green)
- crochet hook
- wire
- tool
- scissors
- buttons


First, crochet a flower. I made a tutorial on crocheted flowers. It's easy to follow... you might as well check youtube for some great video tutorials!


After finishing the flower, put it aside and then take your wire, a button and the tool.


Fold the wire in the middle and


put it through the button.


Next, put the wire with the button through the middle of your flower.


That's what it will look like at the back of the flower.


Then, twirl the wire to make sure it stays in its place. I used my tool to help me! :)


Now, take the green yarn and wrap it around the wire. This is your flower stalk.


And guess what?! You are done!


A quick and easy and fun project to light up your Sunday!

Happy Crafting!

xo.
Katja

Come and say hello


It has already been two months that I showed you the first flowers of spring in my garden. These last two months I spent more and more time in the garden. All the sun and rain is doing the plants well. Both the ones a I want and the ones that don't belong in my garden. So I have done a lot of weeding, planting, replanting and seeding.
I dedicated the front part of the garden, closest to the house, to edible herbs. Some of them already started to bloom. Since I don't really need all the herbs to eat, I let them bloom for the biggest part and keep just a little bit free of flowers, so I can eat them too.
The back of the garden is one big wilderness. Last year I took some different seed mixtures, both with indiginous and cultured plants and just trew them in the garden. The result was beautiful! All summer long this part of the garden was full of flowers and buzzing with bees. This year I try to get mostly indiginous species. So again I trew in some seed mixtures, but this time only with plants that belong here.
Well, I think I have talked enough now, let me take you for a little walk in the garden.


DIY make (fabric) butterflies


Hi :) I'm Vera and i'm the orange owl with the balloons. I 32 years, married with Harold and i work parttime as a teacher at a primary school. In my free time i paint, scrap and developing my skills on the sewingmachine, with knitting and crochet. I will make a post here every thursday. My posts are about inspiration, daily life, home and garden ideas, DIY projects and craft ideas for/with kids :D

For today i have a little spring/Easter DIY. It's really easy to make yourself and you can even make it together with your kids (they do have to use the siccors ;)) Spring has arrived and it's time to clean your house (ehhh i haven't done mine yet lol) and bring some spring inside.

DIY MAKE (FABRIC) BUTTERFLIES FOR YOUR
CURLY WILLOW EASTER BRANCH
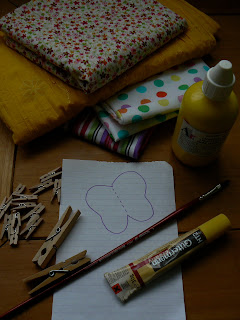
You will need:
- (little) clothespins
- all sorts of fabrics
- fabric glue or double sticky tape
-(fabric) siccors
- paint is optional
-draw a butterfly on paper

If you don't have any fabrics lying around or
you don't want to use them,
you can also use some pretty
giftwrapping paper!

To make one butterfly you need to cut out the pattern two times.
I used fabric glue, but you can also use sided tape.
If the two fabrics are glued together and the sides aren't
completely matching, just cut a little on the sides.

I made three different ones for you to see :D

1. is the one that i made above
2. a butterfly made out of giftwrapping paper
3 made out of a single fabric and sewed together
in the middle

NOTE
If you are not planning of hanging them in your
Easter curly willow branches, you can also make
them and add them on top of a gift or giftcard!

I also made some flowers, wich i also added
with a clothespin. I used crepe paper and a
few other papers. Just make sure that the
paper is flexible.

Draw a flowershape and cut it out.
You can make a single flower, double or triple.
Fold them together in the middle
and you have a pretty flower.
If you like you can make
flowers by doing origami etc.

So here it is... my handmade
butterfly/flower branch!


I also made one with bows :D

This is the one i have in my livingroom!

I hope you have enjoyed this post and feel inspired by it. If you have any questions, just leave a comment! Next week i will make a post about making flowers with different materials :D Hope to see you then :) Wishing you a lovely day. XO.