party time

I am a day late, sorry for that! Weather is crazy hot here and buzy preparing my 30th birthday party :) I'll be 29 for just one more night.

Acording to the weather forecasts it will be 30-something degrees on the party day, saturday. This has had a big influence on my shopping list: I need a lot of icecubes, cold drinks, icecream and salads for dinner and lunch. I plan on making special icecubes, with a little leaf of mint or a little piece of fruit in it. I hope to do all the cake baking tomorrow. This is the first time I plan to make all cupcakes and mini apple cakes. Usually I make a couple of cupcakes, but mostly big apple cakes.

I am not sure about the decorations yet. I'll definately do something with flowers and garlands. But maybe some balloons too. I would like to go with an all green and natural theme, but I don't know if I'll have enough time and energy for that.
A great inspiration for the decorations is this video:


But, as I am planning, having great ideas and wanting a lot, it is also hot, very hot. This makes me want to go to the beach all day, swimming, canoeing, reading in the shade, and be lazy all day long.

Style.

Happy Sunday everyone!

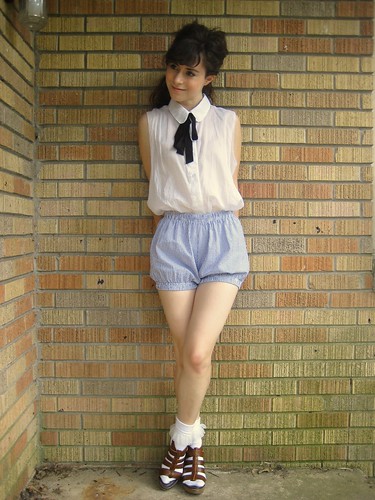
Since it has been a very busy weekend for me, I am not sharing a DIY I made today. BUT the next tutorial will be a cute one <3 In the meantime... I want to tell you something about fashion. I wouldn't consider myself as a fashion victim or someone who has an incredible style when it comes to fashion. But over the years I have developed some kind of "my" style. You know, a bit retro, a bit classy, a bit crazy. I LOVE the "old" fashion style as well as some funky cute stuff! :)


Well, I borrowed these pictures from the WARDROBE REMIX flickr group. You should check it, there are so many great and inspiring outfits around!

Well, and now a bit of me:


What's your style???

xo.
Katja

Color Strength

 Johann Wolfgang Goethe (1749-1832) was a writer and a scientist, who expanded the ideas of color theory from Newton's purely physical theories to a one including our perception. He argued that color doesn't merely depend on the object and light, but also on our brains and our experiences.

In Designer's Color Manuel (by Tom Fraser and Adam Banks), I found Goethe's color ratio diagram, which I thought was really neat! It shows the visual strengths of the primary and secondary colors. Yellow is the strongest and violet is the weakest. This means that to balance the colors, you would need three times the amount of violet as yellow! The colors are rank as follows:
9 - Yellow (strongest)
8 - Orange
6 - Red
6 - Green
4 - Blue
3 - Violet (weakest)

Or compared in a graph:
9 - Yellow  
9 - Yellow   8 - Orange  
9 - Yellow   8 - Orange   6 - Red   6 - Green
9 - Yellow   8 - Orange   6 - Red   6 - Green   4 - Blue
9 - Yellow   8 - Orange   6 - Red   6 - Green   4 - Blue   3 - Violet
9 - Yellow   8 - Orange   6 - Red   6 - Green   4 - Blue   3 - Violet

Red and green are equal in visual strength, but you would need twice as much violet to compare. And you would need twice as much blue to balance any amount of orange. It's a simple system that you can use to balance all types of arts, crafts, even home decorating and your wardrobe :)

DIY for kids -make your own dreamcatcher-

For today my first DIY for kids on the birdsblog. I don't know if our readers have kids, but even if you don't it's a fun project to do with kids from friends, with cousins, nephews or in your art class :) I would recommend to do this together, just make sure that when your child is making one you can keep an eye on what they are doing!

Supplies:
-chenille wire
-siccors (for cutting the chenille wires)
-beads
-feathers


Pick one chenille wire and make a round shape, knot
it together. I used a thicker one for the outside &
smaller ones on the inside.

Pick a chenille wire in the color that you like
and wrap it around one side and then on the
other. The rest of the wire that you won't
be needing can be cut.

After the purple one i used a green orange and
blue chenille wire from one side to the other.

After that i used yellow to make a smaller
round in the middle.

add some small wires from the outside
round to the middle round and pick
any color that you like.

Now it's time to make a round so that you
can hang your dreamcatcher ;)

Get some chenille wire and make a little round shape.
Then wrap it around the top of your dreamcatcher,
make sure it's tight!

I added one bead and pulled the chenille wire through.
I wrapped the wire around in the middle a few times.

You can only use bigger beads, because they have
bigger holes ;) If you like to add more beads, you
can do that every time that you are adding wire.

Okay final step!
Get your feathers xD
Confirm your chenille wire on the bottem
and add as many feathers that you like.
I used 3 chenille wires (i made
one with two colors) and tree feathers.

ta da!! you are ready!!

If your child likes to craft and he or she's a little older (9 years) they can try the advanced one! This one is also for grown ups ;) I made a post on my own blog a few days ago, here's the link


Enjoy your dreamcatcher(s)!!
Leave me a link if you have made one
or add it to our flickr group

Loves,
Vera

DIY Make your own butterfly net

Summer is here! This is the time of year I love to be outside all day long. Cycling, walking, or just sitting down and watching all the life around me. Sometimes I take my flora (a book about wild plants) with me and try to figure out all the names of the wild plants I find. And other times I take my butterfly net with me to catch some insects and try to figure out their names. I mainly catch dragonflies (Odonata), which are pretty easy to bring to name.
For quite some years now I have a 'professional' butterfly net, which can be folded. But before that, I used to make my own. Today I will share my 'recipy' for making butterfly nets.


You will need:
- an old badminton racket
- tule or even better, lace curtains (simple ones, with tiny (<1mm), but not to tiny holes)
- scissors
- needle and thread

Take the cords out of your racket.
Cut out a piece of the tule or curtain, that is al little wider than the circumference of the racket and about as long as your arm.
Fold the fabric in half.
sew along the bottom and side of the fabric, leaving about 2,5 cm of the side from the top and the top open (this is one of the sides you made a little wider than the circumference of the racket). I prefer to sew rounded edges on the bottom of the net, but straight workes also fine.
Cut of the excess of fabric.
Fold the top of the net around your racket and sew it. You can make a nice tunnel to go around the racket or simply fold the fabric round the racket and use the holes that are left after you took the cords out to sew through.
Your butterfly is ready to use.

Please be carefull with the insects you catch. Make sure you don't harm them and they don't hurt you.


DIY Sunday: paper napkin wreath

Hello everyone!

It's Sunday and Sunday means DIY-day :) So here's a new and very easy DIY for you:


This cute wreath is made from colourful paper napkins... Try it, it's easy and fun!


You will need a wreath, paper napkins in at least 2 different colours, pins and scissors.


Take a napkin and cut a circle from it.


You will actually get 4 circles (because the napkin is folded ^^)


Now fold one circle to the middle.


And then again to the middle.


See?!


Repeat and wrap your second folded circle around the first one.


Like this.


Fold them.


And use a pin to fix it to your wreath.


Now, pull the layers all the way around...


I think you get the idea of what I am talking about ;)


I used different sizes of circles and different colours to get a cuter look.


Now, be creative with different shapes and colours and styles of your napkin flowers and hang your wreath where it looks cute! :)

Happy crafting,

Katja

Shoes!

 For a long time I only bought shoes that would go with (nearly) everything. Brown and black shoes are must-haves. But what about shoes that pop? They are a great way to make an outfit shine! Do you have any bright shoes? My favs are a pair of yellow stilettos - couldn't resist!
(images from weheartit)

My challenge this week: Wear shoes that pop! Then post your photos on Flickr so we can see :)